In my previous post, I explained how to prepare your environment to run the Rapid Cyberattack Assessment tool, and I told you that the questions in the tool would tell you a story.
So, let’s get started with the storytelling, shall we?
Survey Mode or Full Assessment?
Once you start the tool, you are asked if you want to run the tool in Survey Only mode, or in the Full mode.
What’s the difference?

- Survey mode simply asks a set of questions that relate to your environment and then provide you with some guidance on what you should look at to start protecting against ransomware.
- Full mode includes the survey questions, but it also runs a technical assessment against the machines in your environment to identify specific vulnerabilities.
Thus, survey mode is much quicker – but provides you with less information about the actual machine sin your environment.
This is the mode we will use for the tool.
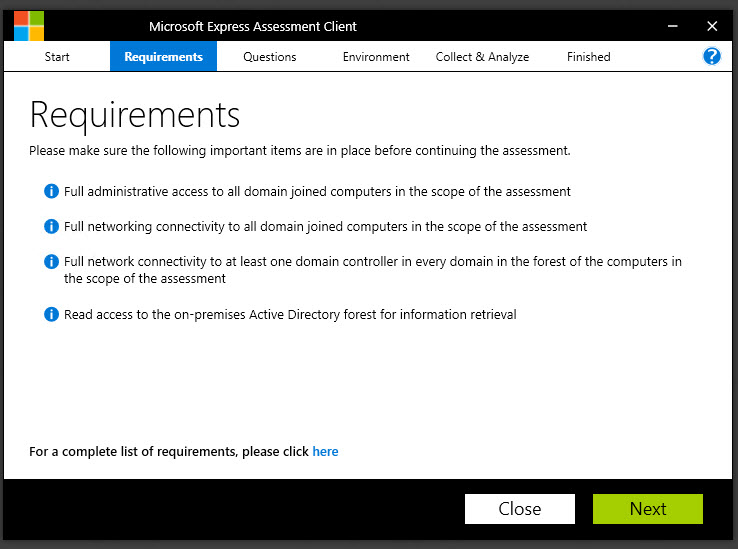
The next page just outlines the requirements for running the tool, which we discussed previously.
Now comes the fun part…the questions.
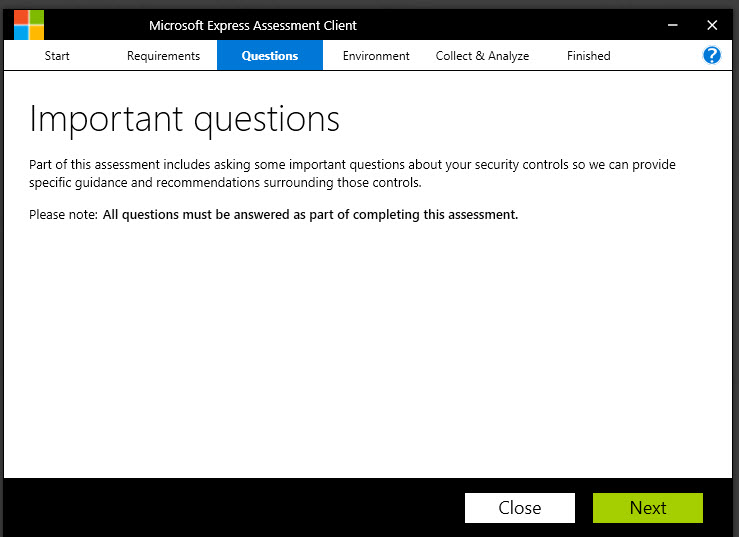
The Story-Telling Questions
The first question relates to patching.

Question:
“How long does it take to deploy critical security updates to all (99%+) Windows operating systems?”
Why do we ask?
When Petya hit in the summer of 2017, some of the worst-hit organizations were those who had failed to apply one patch to their Windows operating systems. The “Eternal Blue” exploit, which takes advantage of how SMBv1 handles specific types of messages, had been patched three months before Petya made headlines.
(https://docs.microsoft.com/en-us/security-updates/SecurityBulletins/2017/ms17-010)
If organizations had applied the patches to their systems within 30 days, it’s possible that they could have eliminated their exposure to that exploit.
————————————————————
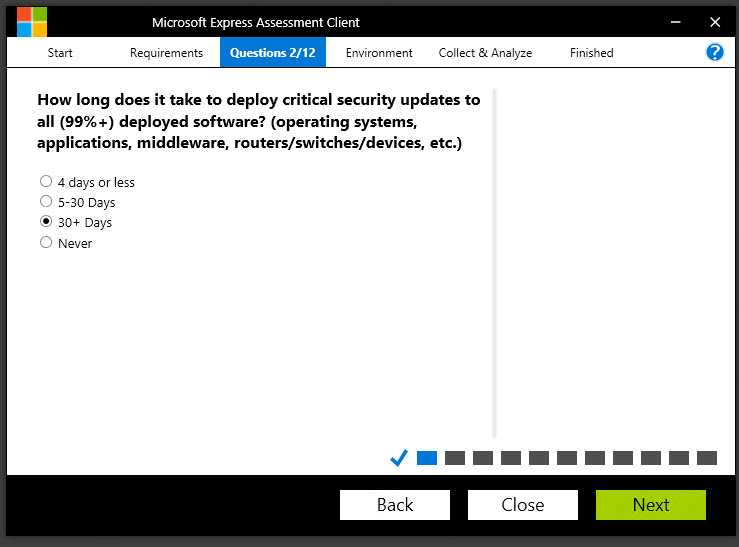
Question:
How long does it take to deploy critical security updates to all (99%+) deployed software (operating systems, applications, middleware, routers/switches/devices, etc.)?
Why do we ask?
Petya didn’t specifically leverage a weakness in, for example, a switch’s operating system. But it should go without saying that any vulnerability that exists on ANY piece of networking equipment or application or middleware is a weakness in the overall chain. If, for example, an adversary can compromise a switch and gain administrative control over all the traffic flowing between machines, they would then potentially have the ability to capture passwords and other critical information, which then allows them to make their next move.
———————————————
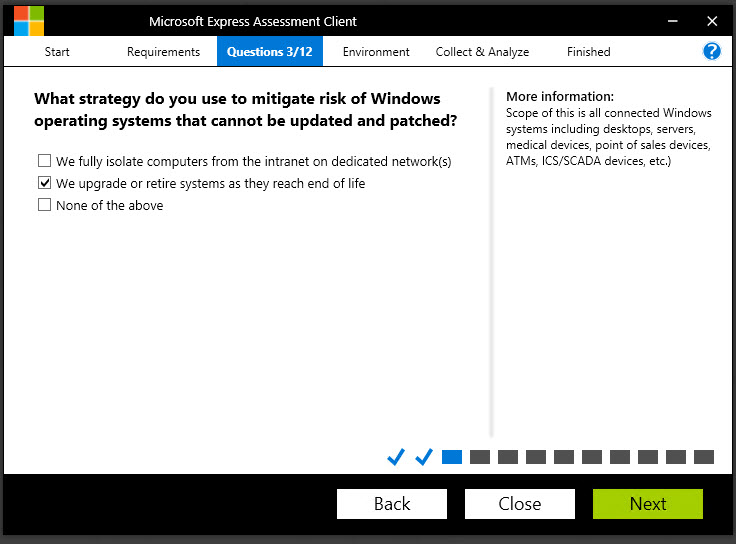
Question:
What strategy do you use to mitigate risk of Windows operating systems that cannot be updated and patched?
Why do we ask?
Unfortunately, some of the organizations that were most severely compromised by Petya/NotPetya/WannaCry had been running versions of Windows that have LONG been unsupported. There may genuinely be reasons why they haven’t been updated. Perhaps they are running software from a third-party that has not been tested against newer operating system versions. Maybe the third-party software vendor went out of business and no suitable replacement has been found. Regardless of the reason why the legacy operating systems exist, the key thing that needs to be addressed is “how do we reduce the risk of keeping these systems around?”. If they cannot be upgraded, can they be isolated on a network that isn’t connected to the Internet, and that separates them from the production network? Remember, if one machine can be compromised, it presents a potential threat to every machine on the network.
———————————————————-

Now the questions start to get a bit more complex….
Question:
What is your strategy on staying current with technology?
Why do we ask?
This question is really asking, “Are you taking advantage of every improvement in security – whether in the cloud, in Microsoft products, on MacOS, the various flavors of Linux, mobile devices, etc.?”
It’s probably safe to say that most of the major software and hardware vendors do their level best to improve the security posture of their products with every new release – whether it’s adding facial recognition, or stronger encryption, or even just addressing vulnerabilities that found their way into previous versions of code. If your user base is running primarily on Windows 7 or *gasp* Windows XP, there are, without any question, vulnerabilities that they are exposed to. Windows XP has, of course, reached its end-of-life, so any exploits identified for Windows XP are no longer being patched by Microsoft. That means these vulnerabilities will exist on your network for as long as those machines exist on your network.
That’s a little scary.
The same is true of mobile devices, Mac OS, Linux machines, and so on. Unless they are updated, they will continue to be targeted by the bad guys using common, well-known exploits.
Don’t gamble with your network.
Stay current to the extent that you can do so.
——————————————————-

Question:
Which of the following is true about your disaster recovery program?
Why do we ask?
This is an interesting question. I’ve worked with a couple hundred Microsoft customers over the years, and it’s always interesting to hear exactly how each customer defines their disaster recovery strategy. Most customers have a regular backup process that backs up critical services and applications every day, or every couple hours. Most of those customers probably ship their backup tapes to an offsite tape storage facility for safekeeping in the event of a disaster. Many organizations will say they regularly validate the backups – when what they might mean is “I was able to restore Bob’s Excel file from two weeks ago, so I know the backup tapes are good.” Many organizations also perform some form of highly controlled DR testing yearly or quarterly.
But when you think about what Petya did, are those measures adequate? Imagine every one of your machines completely inoperable. You can recall all the backup tapes you’ve ever created, but your BACKUP SERVER is encrypted by ransomware. Now what? And even if it wasn’t, you can’t authenticate to anything because your domain controllers are encrypted. You can’t even perform name resolution because your DNS servers are encrypted. You could try to send an email from Office 365, but if you have ADFS set up, the authentication for Office 365 is happening on-premises…. against the domain controllers….which are encrypted by ransomware. This is the situation that some organizations faced.
Very few customers who were hit by Petya were prepared for a scenario where EVERYTHING was inoperable, all at the same time. Many were relegated to communicating via text message and WhatsApp because every other communication channel was inaccessible.
——————————————————

Question:
Which of the following measures have you implemented to mitigate against credential theft attacks?
Why do we ask?
Here’s the sad truth about Petya. There were organizations that had 97% (or more) of their workstations patched against the Eternal Blue exploit that we talked about earlier. But Petya didn’t just use one attack vector. Even if only one of the machines on a network of 5,000 machines was unpatched – that was enough of a wedge for Petya to gain a foothold. The next thing it did was attempt to laterally traverse from machine to machine using the local administrator credentials it was able to harvest from the unpatched machine. It would then attempt to use those credentials to connect to all the other machines on its subnet. So even if those machines were patched, if the administrator passwords were the same on those machines, those machines were toast.
Now think about that. How many organizations use a single administrator account and password on every desktop/laptop on the network? Based on what I’ve seen – it’s probably a sizable number. So even if those IT admins are very conscientious about patching, if they use the same local administrator password on every machine, a compromise of one machine is effectively a compromise of ALL the machines.
But how do you manage different passwords on thousands of different machines on a network?
We’ll discuss this quandary in a moment.
——————————————————
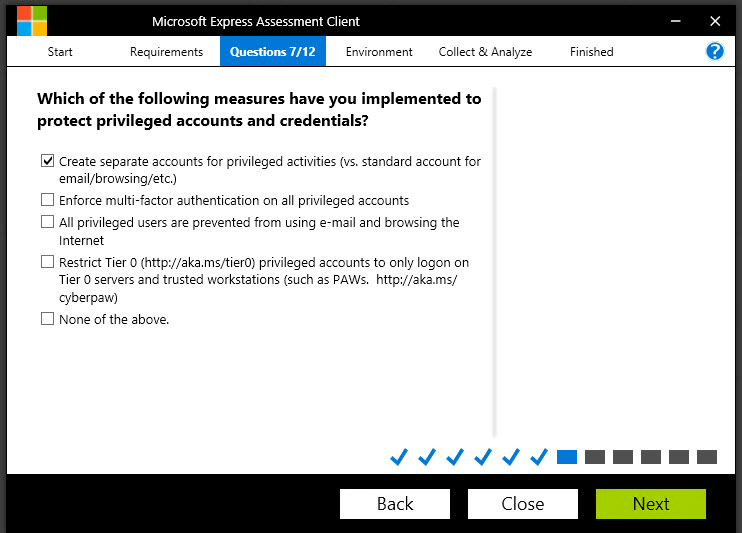
Question:
Which of the following measures have you implemented to protect privileged accounts and credentials?
Why do we ask?
It should be obvious that protecting your high-value credentials is important, but let’s talk about the measures you can choose from in the list:
- Create separate accounts for privileged activities (vs. standard accounts for email/browsing, etc.): Many organizations have learned this lesson and are good about creating separate sets of credentials for administrative activities and a lower-privileged account for everyday IT worker stuff like checking email, creating documents and surfing the web.
- Enforce multi-factor authentication on all privileged accounts: I’m happy to say I’m seeing many more organizations using multifactor authentication for highly-privileged accounts, whether it’s a token, or a phone-based tool like Microsoft Authenticator, or whatever. This is great to see, and I encourage every organization to start looking into MFA. In fact, Office 365 and Azure have MFA capabilities built right in – you just need to turn them on.
- All privileged users are prevented from using email and browsing the internet: The key word here is I would venture to say that most organizations advise their admins not to use their admin accounts for browsing the web or checking email. But what if you are fixing a problem with a server and Microsoft has a hotfix that you need to download. Can’t you just this once…..? The answer is “no”. Admin accounts should be prevented from browsing the internet. Period. Nothing good can come of browsing the wild and wooly internet with an admin account. It’s like walking in a seedy part of the city at night with $100 bills hanging out of your pocket.
- Restrict Tier 0 privileged accounts to only logon on Tier 0 servers and trusted workstations (such as PAWs): This is one of the most critical parts of securing administrative access. A core principle for securing administrative access is understanding that if admin A is logged into Workstation A, and he then makes an RDP connection to Server B, then the workstation is a “security dependency” of the server. Put simply, the security of Server B depends upon the security of Workstation A.

If administrative credentials can be harvested from Workstation A due to lax security controls (for example, using pass-the-hash or pass-the-ticket techniques) then the security of Server B is jeopardized. Therefore, controlling privileged access requires that Workstation A be at the same security level as the machines it is administering. Microsoft’s Privileged Access Workstation (PAWs) guidance can help you understand how to accomplish this.
Microsoft IT enforces the use of Privileged Access Workstations extensively to manage our own privileged assets.
Take the time to read more about Privileged Access Workstations here: http://aka.ms/cyberpaw
——————————————-

Question:
Which of the following risk mitigation measures have you implemented to protect Tier 0 assets (Domain Controllers, Domain Administrators) in your environment?
Why do we ask?
The concept of “standing administrative privilege” is one that carries a significant element of risk today. It’s a much better practice to leverage “Just In Time” privileges. This means that the administrator requests, and is granted, the access they need AT THE TIME THEY NEED IT. When the task they are performing is complete, the privilege is revoked. When they need the privilege again, they need to request the access again. This is also good for auditing purposes.
A corollary to this idea is “Just Enough Admin” access. In this scenario, an admin is given THE LEVEL OF PERMISSIONS THAT THEY NEED, AND NO MORE. In other words, if you need to perform DNS management tasks on a Windows server, do you NEED Domain Administrator credentials? No, there is a DNS Administrator RBAC group that can be leveraged to grant someone the needed level of permissions.
Combine “Just Enough Admin” with “Just-In-Time” access, and you significantly reduce the chance of administrative credentials being exposed on your network.
More info here:
———————————————————
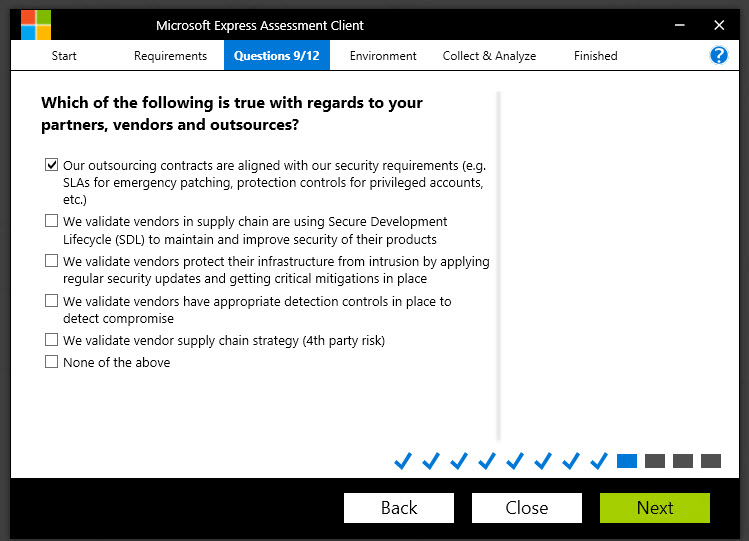
Question:
Which of the following is true with regards to your partners, vendors and outsources?
Why do we ask?
This is related to one of the more fascinating aspects of the Petya attack.
MeDoc is a company based in Ukraine that makes financial accounting software used by many business and organizations in Ukraine. The Petya attack began when a threat actor compromised the MeDoc application and inserted the Petya ransomware payload into one of the update packages. When the MeDoc customers received their next update, they also received the Petya ransomware. From there, Petya started looking for machines that were vulnerable to the Eternal Blue exploit. Once it found a vulnerable machine, it began attempting the lateral traversal attacks using local administrator privileges that we talked about earlier.
You see how the whole picture is starting to come together? Every question tells a story!
The point behind this question is this: in today’s world, it isn’t enough to simply consider your own security controls and processes. You also must consider the security practices of the vendors and partners you’re doing business with and understand how THEY react to attacks or compromises, because their threats could very well be your threats someday.
———————————————————–

Question:
Which measures do you have deployed to protect your environment from malware?
Why do we ask?
Any IT admin worth their paycheck has for years been fighting the good fight against things like malware and spam.
But there’s a little more to the question than simply asking if you have an anti-spam and anti-malware component to your network management strategy. The question is also asking “how well does your anti-malware solution protect against the more sophisticated attacks?”
Consider this: from the time that no machines were infected by Petya to the time that tens of thousands of machines were infected by Petya was only about 3 ½ HOURS. That is simply not enough time for an antivirus vendor to reverse engineer the malware, develop a signature, and get it pushed down to their customers. The only real way an antimalware solution can be effective at that scale is if it gets telemetry from millions of endpoints, can detect anomalies using machine learning within SECONDS and take action to block across the world.
For an account of how Windows Defender did exactly that against the DoFoil crypto mining malware, read this story:
———————————————————
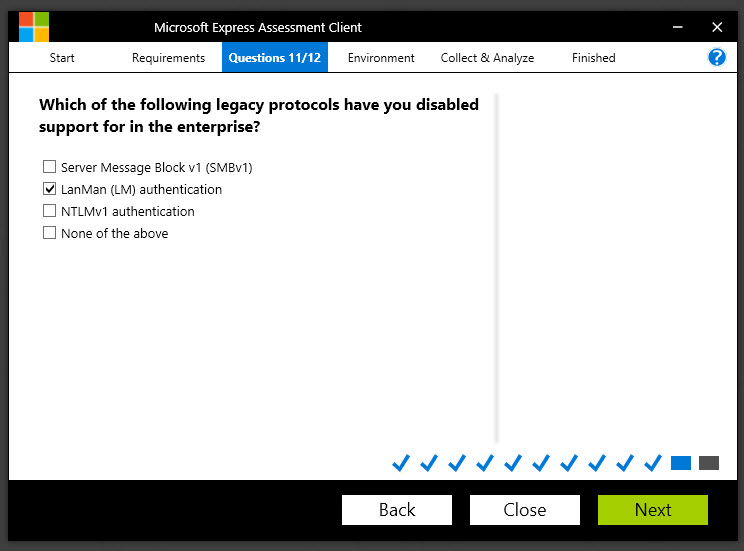
Question:
Which of the following legacy protocols have you disabled support for in the enterprise?
Why do we ask?
As mentioned earlier in this article, the Petya attack exploited a vulnerability in the SMB V1 protocol that was nicknamed Eternal Blue. SMB (also known as CIFS) is a protocol designed to allow shared access to files, printers and other types of communication between machines on a Windows network.
However, SMB v1, as well as LanMan and NTLM v1 authentication have vulnerabilities that make them potential security risks.
Remember, any protocol that isn’t being used should be disabled or removed. If a protocol is still being used and cannot be removed, at the very least, you need to ensure it is patched when needed.
Learn how to detect use of SMB and remove it from your Windows network here:
——————————————————–

Question:
How do you manage risk from excessive permissions to unstructured data (files on file shares, SharePoint, etc..)?
Why do we ask?
Indeed, why does having knowledge of the permissions on a file share have anything to do with a ransomware attack? Again, there’s a key word here: excessive permissions.
For example, one very common mistake is to assign permissions to the “Everyone” group on a file share. The problem, as you no doubt are aware, is that the Everyone group does not simply mean “everyone in my company”. For that purpose, the “Authenticated Users” group is what you are likely thinking of, since that includes anyone who has logged in with a username and password. However, the Everyone group includes Authenticated Users – but it also includes any user in non-password protected groups such as Guest or Local Service. That’s a MUCH broader group of user accounts, and its possible that some of those accounts are being exploited by people who may be trying to do bad things to your network.
The more people or services there are that have permissions on your network, the greater the chances that one of them will inadvertently (or intentionally) do something bad. It’s all about reducing your risk.
Therefore, a best practice is to perform an audit of your file shares and remove any excessive permissions. This is a good practice to perform anyway, since users change roles and may have permissions to things that they no longer need (such as if an HR person moves into a Marketing role).
—————
Well, that’s a lot of questions, huh?
In my final post, I’ll show you the last couple steps in using the tool and then walk through the findings.