Secure Your Office 365 Tenant – By Attacking It (Part 2)

By David Branscome


In my previous post (https://blogs.technet.microsoft.com/cloudyhappypeople/2018/04/04/secure-your-office-365-tenant-by-attacking-it ), I showed you how to use the Office 365 Attack Simulator to set up the Password Spray and Brute Force Password (Dictionary) Attacks.

What we often find, though, is that spear phishing campaigns are extremely successful in organizations and are often the very first point of entry for the bad guys.

Just for clarity, there are “phishing” campaigns and there are “spear phishing” campaigns.

A phishing campaign is typically an email sent out to a wide number of organizations, with no specific target in mind. They are usually generic in nature and are taking the approach of “spreading a wide net” in hopes of getting one of the recipients to click on a URL or open an attachment in the email. Think of the email campaigns you’ve likely seen where a prince from a foreign country promises you $30 million if you’ll click on this link and give him your bank account information. The sender doesn’t particularly care WHO gets the email, as long as SOMEBODY clicks on the links.

On the other hand, a spear phishing campaign is much more targeted. In a spear phishing campaign, the attacker has a specific organization they are trying to compromise – perhaps even a specific individual. Maybe they want to compromise the CFO’s account so that they can fraudulently authorize money transfers from the organization by sending an email that appears to be coming from the CFO. Or maybe they want to compromise a highly-privileged IT admin’s email account so that the attacker can send an email asking users to browse to a fake password reset page and harvest user passwords. The intent with a spear phishing campaign is to make the email look very legitimate so that the recipients aren’t suspicious – or perhaps they even feel obligated to do as instructed.

What Do I Need?

As you can imagine, setting up a spear-phishing campaign takes a little more finesse than a brute force password attack.

First, decide WHO the sender of the spear phishing email will be. Maybe it’s HR requesting that you log in and update your benefits information. Or perhaps it’s the IT group asking everyone to confirm their credentials on a portal they recently set up.

Next, decide WHO you want to target with the campaign. It may be the entire organization, but keeping a low profile as an attacker also has its advantages.

You’ll probably want to use a realistic HTML email format so that it looks legitimate. The Attack Simulator actually provides two sample templates for you, as we’ll see below. Using the sample templates makes the campaign very easy to set up, but as you get more comfortable using the Attack Simulator, you will likely want to craft your own email to look more like it’s coming from your organization.

That should be enough to get us started.

Launching a Spear Phishing Attack

In the Attack Simulator console, click on “Launch Attack”.


At the Provide a name to the campaign page, choose your own name, or click on “Use template”. If you click on “Use template” you will see two template options to choose from. I’ve chosen “Prize Giveaway” below:


Next, select the users you want to “phish”. You can select individual users or groups.


On the next page, if you’ve selected a template, all the details will be filled in for you. One important value to note here is the Phishing Login server URL. Select one of the phishing login servers from the drop down. This is the way the attack simulator is able to track who has clicked on the URL in the email and provides reporting.

Note that the URL’s for the phishing login servers are NOT actually bad sites. They are sites set up specifically for the purposes of this tool’s functioning.


In the Email body form, you can customize the default email. Make sure that you have a variable ${username} so that the email looks like it was sent directly to the end user.


Click Confirm, and the Attack Simulator will send the email out to the end users you specified.

Next, I opened the Administrator email account that I targeted and saw this:


Notice that it customized the email to the MOD Administrator account in the body of the email.

If I click on the URL (which points to the http://portal.prizesforall.com URL we highlighted earlier) I get sent to a website that looks like this.


Finally, if I click on the reporting area of the Attack Simulator, I can see who has clicked on the link and when.


Okay. But seriously…would you really have clicked on that URL?

Probably not.

So how do you make it a little more sophisticated?

Let’s create a more realistic attack.

In this attack we will use the Payroll Update template, which is very similar to what you might actually see in many corporate environments.  You can also create your own HTML email using your organization’s branding and formatting.


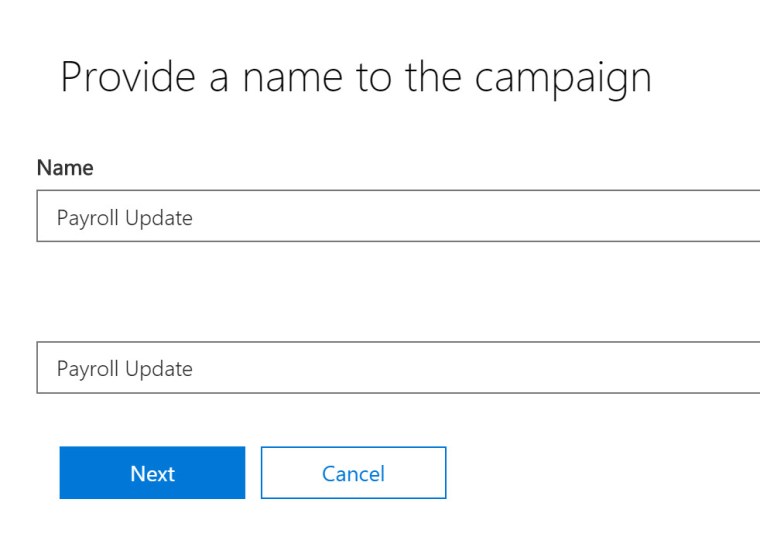
I’ll again target the MOD Administrator because he seems like a good target, since he’s the O365 global admin (and seems to be somewhat gullible).

In this situation though, instead of sending from what appears to be an external email address (prizes@prizesforall.com, used in the previous attack) I’m going to pose as someone the user might actually know. It could be the head of HR or Finance or the CEO. I’ll use the actual email address of that person so that it resolves correctly.

Notice that this templates uses a different phishing login server URL from the drop down. You’ll see why in a second.

In the Email body page, we’ve got a much more realistic looking email.

It should be noted, though, that if you make the email look ABSOLUTELY PERFECT and people click on the URL, what have they learned? It’s best to provide a clue in the email that a careful user would notice and recognize as a problem. Maybe send the official HR email from someone who isn’t actually in HR, or leave off a footer in the email that identifies it as an official HR email. Whatever it is, there should be something that you can use to train users to look out for.

So if you read the email template below carefully, you’ll see some grammatical errors and misspellings that should be a “red flag” to a careful user.


Again, you Confirm the settings for the attack and the attack launches.

Going to the MOD Administrator’s mailbox….that’s much more realistic, wouldn’t you say?


When I click on the “Update Your Account Details” link, I get sent to this page, where I’m asked to provide a username and password, which of course, I dutifully provide:


Notice, however, that the URL at the top of the page is the portal.payrolltooling.com website – even thought the page itself looks like a Microsoft login page. Many attacks will mimic a “trusted site” to harvest credentials in this manner. When you’re testing you can use any email address (legitimate or not) and any password for testing – it isn’t actually authenticating anything.

Once I enter some credentials, I am directed to the page below, which lets me know I’ve been “spear phished” and provides some hints about identifying these kind of attacks in the future:


And finally, in the reporting, I see that my administrator was successfully spear phished.


The Value of Attack Simulations

This is all interesting (and a little bit fun) but what does it really teach us? The objective is that once we know what sort of attacks our users are vulnerable to (password or phishing are the two highlighted by this tool), then we can provide training to help enhance our security posture. Many of the ransomware attacks that are blanketing the news lately started as phishing campaigns.

If we can take steps to ensure that our users are better equipped to identify suspicious email, and help them select passwords that aren’t easily compromised, we help improve the organization’s security posture.


Secure Your Office 365 Tenant – By Attacking It (Part 1)

By David Branscome

I’ve been waiting several months for this day to arrive. The Office 365 Attack Simulator is LIVE!

If you log into your Office 365 E5 tenant with the Threat Intelligence licensing, it shows up here in the Security & Compliance portal.

When you click on it, the first thing it will tell you is that there are some things you need to set up before you can run an actual attack. There’s a link that says, “Set up now” (in the yellow box shown below). After you click that link, it says the setup is complete, but you’ll have to wait a little while before running an attack. (I only had to wait about 10 minutes when I set it up)


It also reminds you that you need to have MFA (multi-factor authentication) set up on your tenant in order to run an attack. This makes a lot of sense, since you want to ensure that anyone who runs the attack is a “good guy” on your network.

To set up MFA, follow the steps here:

Go to the Office 365 Admin Center

Go to UsersActive users.

Choose MoreSetup Azure multi-factor auth


Find the people who you want to enable for MFA. In this case, I’m only enabling the admin account on my demo tenant.

Select the check box next to the people you want to enable for MFA.

On the right, under quick steps, you’ll see Enable and Manage user settings.

Choose Enable.


In the dialog box that opens, choose enable multi-factor auth.

The Attacks

Spear Phishing

With a spear phishing attack, I’m sending an email to group of “high-value” users – maybe my IT admins, the CEO/CFO, the accounting office, or some other user group whose credentials I want to capture. The email I send contains a URL that will allow me to capture user credentials or some other sensitive data as part of the attack. When I set up this attack, it needs to look like it’s coming from a trusted entity in the organization. Maybe I’ll set it up to make it appear as though it’s coming from the IT Security group asking them to verify their credentials.

Brute Force Password (a.k.a., Dictionary Attack)

In this attack, I’m running an automated attack that just runs through a list of dictionary-type words that could be used as a password. It is going to use lots of well-known variations, such as using “$” for “s” and the number 0 for the letter O. If you thought Pa$$w0rd123 was going to cut it as a secure password on your Office 365 account, this attack will show you the error of your ways.

This type of attack is pretty lengthy in nature because there are thousands of potential guesses being made against each user account. The attack can be set up to vary in frequency (time between password guesses) and number of attempts.

It’s important to note that if a password is actually found to be successful, that password is NOT exposed to anyone – even the admin running the attack. The reporting simply indicates that the attack was successful against Bob@contoso.com, for example.

Password Spray Attack

A password spray attack is a little different from the brute force password attack, in that it allows the admin/attacker to define a password to use in the attack. These would typically be passwords that are meaningful in some way – not simply an attempt using hundreds, or thousands of guesses. The password you use could be something like the name of a football team mascot and the year they won a championship, or the name of a project that people in one department are working on. Whatever criteria you select, you define what password or passwords should be attempted and the frequency of the attempts.

Ready? Let’s go hunting…

Launching a Password Spray Attack

First, I’ll try the password spray attack. I’ve set up several accounts in my test tenant with passwords that are similar to the one I’ll attempt to exploit – which is Eagles2018!. Notice that, by most criteria, that’s a complex password – upper and lower case, alphanumeric and it includes a special character, but it’s also a fairly easily-guessed password, since the Philadelphia Eagles won the Super Bowl in 2018 (though it pains me to say that).

I’ve set up a couple users with that password to ensure I get some results.

I go to my Attack simulator and click on Launch Attack.

The first screen is where I name the attack.


Next, I select the users I want to target. Notice that I can select groups of users as well.


Now I manually enter the passwords I want to use in the attack.


Confirm the settings, click Finish and the attack will begin immediately.

If I go back to my Attack Simulator console, I can see the attack running.


After the attack completes, I see the users who have been compromised using the password.

(Yes, I’ve reset their passwords now, so don’t try and get clever.) 😊

Now I politely encourage ChristieC and IrvinS to change their password to help ensure their account security.

Launching a Brute Force Password (Dictionary Attack)

Again, I’ve set up a couple accounts with some pretty common password combinations (P@ssword123, P@ssw0rd!, etc..)

I walk through the configuration of the attack, which is very similar to the Password Spray attack setup.


I set up my target users as before, and then I choose the attack settings.

In this case, I uploaded a text file containing hundreds of dictionary passwords, but you can create a sampling of several passwords by entering them manually one at a time in the field above the Upload button.


As the attack runs, you’ll see something like the screenshot below. Remember, if you have a large number of users and a very large wordlist for the dictionary attack, this attack will run for quite some time as the simulator cycles through all the possible variations for each user.


And again, when the simulation is complete, you’ll want to caution DiegoS on his lack of good password hygiene.

In my second blog post, I’ll show you how to do a Spear Phishing Attack. These are the REALLY sneaky ones….

Stay tuned!


The End of Support for Older TLS Versions in Office 365

by David Branscome, with a callout to Joe Stocker at Patriot Consulting for the heads-up!

The SSL/POODLE Attack Explained

UPDATE: As per the support article listed here (https://support.microsoft.com/en-us/help/4057306/preparing-for-tls-1-2-in-office-365) We will be extending support for TLS 1.0/1.1 through October 31, 2018 in order to help ensure our customers are adequately prepared for the changes.


As most of you know, there was a significant vulnerability identified in the SSL 3.0 protocol back in 2014, named POODLE (Padded Oracle On Downgraded Legacy Encryption).

The problem was this: SSL 3.0 is basically an obsolete and insecure protocol. As a result, it has been, for the most part, replaced by its successors, TLS 1.0 and TLS 1.2. The way a client-server encryption negotiation sequence would typically work is that the client would contact a server, and through a handshake process, agree on the highest level of security over which they both can communicate. So, for example, a client makes a request to a server and says, “I’d like to use TLS 1.2 for our communication, but I can also use TLS 1.0, if you need to.” The server responds with, “I don’t speak TLS 1.2, but I do speak TLS 1.0, so let’s agree to use that.” They then use that downgraded protocol as their preferred encryption method. The downgrade sequence could ALSO downgrade the encryption to use SSL 3.0, if necessary.

However, even in situations where client and server both support the use of the newer security protocols, an attacker with access to some portion of the client-side communication could disrupt the network and force a downgrade to the SSL 3.0 encryption. This is typically referred to as a man-in-the-middle attack, because the attacker sits on the network between two parties and captures their communication stream. This is an altogether separate type of attack, unrelated to the POODLE vulnerability itself, and must be defended against using other methods.

Anyway, now that the attacker has successfully forced SSL 3.0 encryption to be used, and the attacker has access to the communication stream, the attacker can attempt the POODLE attack and get access to decrypted information between the client and the server.

When this vulnerability came out, there was a significant amount of work done worldwide to mitigate the impact and scope of the issue. The vulnerability in SSL 3.0 itself couldn’t be remediated because the issue was fundamental to the protocol itself. Because of this, the best solution for organizations was simply to disable support for SSL 3.0 in their applications and systems.

So That Was 3 Years Ago….

As described in the links at the bottom of this article, Microsoft still supports the use of TLS 1.0 and 1.1 for clients connecting to the Office 365 service. However, due to the potential for future downgrade attacks similar to the POODLE attack, Microsoft is recommending that dependencies on all security protocols older than TLS 1.2 be removed, wherever possible. This would include TLS 1.1/1.0 and SSL v3 and V2.

The problem here is that many operating systems and applications have a hardcoded protocol version to ensure interoperability or supportability. In Windows 8 and Windows Server 2012 and higher, the default protocol that is used is TLS 1.2 – which is good.

However, in Windows 7 and Windows 2008 R2, TLS 1.0 was the default protocol. In fact, TLS 1.1. and 1.2 were actually configured as “disabled”. See the table below:


As outlined in the article “Preparing for the mandatory use of TLS 1.2 in Office 365”, this is going to present a problem if your organization is still using Windows 7/Vista clients. Why?

Because on October 31, 2018, Microsoft Office 365 will be disabling support for TLS 1.0 and 1.1. This means that, starting on October 31, 2018, all client-server and browser-server combinations must use TLS 1.2 or later protocol versions to be able to connect without issues to Office 365 services. This may require certain client-server and browser-server combinations to be updated.

Our internal telemetry of client connections indicates that this shouldn’t be a problem for most organizations, since the majority are not using TLS 1.0 or 1.1, anyway. However, for the network you manage it’s probably a good idea not to simply assume everything will be great. 😊

As an example, if you’re using any on-premises infrastructure for hybrid scenarios or Active Directory Federation Services, make sure that these infrastructures can support both inbound and outbound connections that use TLS 1.2.

How Do I Know if I Need to Take Action?

A new IIS functionality makes it easier to find clients on Windows Server 2012 R2 and Windows Server 2016 that connect to the service by using weak security protocols.

https://cloudblogs.microsoft.com/microsoftsecure/2017/09/07/new-iis-functionality-to-help-identify-weak-tls-usage/

There are also some simple checks available from Qualys Labs to check browser compatibility – https://www.ssllabs.com/ssltest/viewMyClient.html as well as the certificate and encryption configuration on your servers with SSL certificates – https://www.ssllabs.com/ssltest/ .

Hopefully these checks will help you to ensure that your organization is ready when the change is made to the Office 365 services early next year.

Additional Resources

Preparing for the mandatory use of TLS 1.2 in Office 365

https://support.microsoft.com/en-us/help/4057306/preparing-for-tls-1-2-in-office-365

Solving the TLS 1.0 Problem

https://www.microsoft.com/en-us/download/confirmation.aspx?id=55266 

Disabling TLS 1.0/1.1 in Skype for Business Server 2015 – Part 1 and 2

https://blogs.technet.microsoft.com/nexthop/2018/04/18/disabling-tls-1-01-1-in-skype-for-business-server-2015-part-1/

https://blogs.technet.microsoft.com/nexthop/2018/04/18/disabling-tls-1-01-1-in-skype-for-business-server-2015-part-2/

Implementing TLS 1.2 Enforcement with SCOM

https://blogs.technet.microsoft.com/kevinholman/2018/05/06/implementing-tls-1-2-enforcement-with-scom/

Exchange Server TLS Guidance

https://blogs.technet.microsoft.com/exchange/2018/01/26/exchange-server-tls-guidance-part-1-getting-ready-for-tls-1-2/

https://blogs.technet.microsoft.com/exchange/2018/04/02/exchange-server-tls-guidance-part-2-enabling-tls-1-2-and-identifying-clients-not-using-it/

https://blogs.technet.microsoft.com/exchange/2018/05/23/exchange-server-tls-guidance-part-3-turning-off-tls-1-01-1/

Intune TLS Guidance

https://blogs.technet.microsoft.com/intunesupport/2018/06/05/intune-moving-to-tls-1-2-for-encryption/

Preparing for TLS 1.0/1.1 Deprecation – O365 Skype for Business

https://techcommunity.microsoft.com/t5/Skype-for-Business-Blog/Preparing-for-TLS-1-0-1-1-Deprecation-O365-Skype-for-Business/bc-p/223608

Leveraging the Office 365 Service Assurance Portal in Customer Scenarios

August 23, 2017
By David Branscome

In the partner organization at Microsoft, we get lots of requests from partners that are in the process of responding to an RFP for Office 365 or Azure deployments. Maybe the partner has described the Microsoft datacenters to their customers as being ISO 27001 or FedRAMP compliant. But now the customer has stated that they need to know how certain controls are implemented in Microsoft’s datacenters. In many cases, the customer is audited regularly, and they have to be able to provide evidence that their data is stored in a specific manner or that access is controlled in a specific way.

The problem is, getting access into the Microsoft datacenters is REALLY difficult. Most Microsoft employees haven’t even been in one of the cloud datacenters – including myself. (There’s a decent virtual tour here, but I’d sure like to see all the blinky lights someday.)

In any case, partners don’t have to get a datacenter tour to respond to these types of information requests from customers. The information is literally at their fingertips in the Office 365 portal – just go to the Security & Compliance section and on the left side, find the Service Assurance section.

Wait…I Don’t See it!

But wait a second.

This data isn’t available to everyone. So, a compliance officer with no special permissions in Office 365 would see something like this:

They don’t even see the Admin or Security & Compliance application icons – let alone the Service Assurance menu. Now what?

As you’d expect, not everyone with an account in Office 365 needs to see that organization’s security configuration. If there are some users who need to be able to access the Service Assurance Center, here’s how to grant those permissions:

Log in to the Office 365 portal with Global Admin credentials.

Go to the Security and Compliance app and select Permissions.

In Permissions, check the box for Service Assurance User.

Select Edit role group and in the Members area, click on Edit.

Select Choose members to add the people who should have these permissions.

Click Add and then find the user.

Finish the wizard and you’ll see the user as a member of the Service Assurance User permissions group.

When the user logs in again, they will be able to go to https://protection.office.com and see the Service Assurance center:

Okay…Now What?

Now that you have the necessary permissions, you can start digging into the content in the Service Assurance center. You could start off by looking at all the controls and audited elements, but maybe you want to be more specific in your approach.

Let’s say you want to see how Office 365 meets ISO 27001 standards.

The first thing I’d recommend is to go to the Settings area and define the region whose controls are relevant – in this case, Europe. You’ll also need to select at least one of the industries whose regulations would be relevant to your search, then click Save.

As the green box indicates, you can now go into the Compliance Reports, Trust Documents and Audited Controls and review the content for the relevant region and industry. So, let’s take a look at what’s there.
If you look in the Compliance Reports area, you’ll see the listing of the certificates that Microsoft cloud datacenters have achieved, and you can click on and download the certificate itself.

For example, if I expand the ISO reports section and scroll down, I see a report named “Office 365 Germany ISO 27001 ISO 27017 and ISO 27018 Audit Assessment Report”. If I click on it, I can open the PDF file itself, which provides me with the final report stating that Office 365 meets the expectations for compliance.

But this only tells me if Microsoft complied with the controls or not. It doesn’t tell me what was actually tested as part of the process.

For that, I can go to the Audited Controls section, where I see the ISO 27018-2014 audit report and I can download it for review.

In this case, the report is an Excel spreadsheet which details things like the title of the control, the implementation and testing details, when it was tested and who performed the testing. This kind of information is generally enough for a customer’s audit team to be reassured of Microsoft’s compliance with the standard.
Don’t forget – if you want to change the scope of the controls (the region/country where the controls are relevant, which industry regulations apply, etc..) you can change the parameters in the Settings tab.

The Trusted Cloud

Microsoft is constantly working to achieve, maintain and even exceed compliance standards in order to secure customer data and make our cloud the most trusted one on the planet. The Service Assurance section of Office 365 is one evidence of that effort. Make sure to take advantage of it!
Additionally, check out the resources in the Microsoft Trust Center for information about GDPR, security, protection of user’s personally identifiable information and Microsoft’s commitment to providing customers with the controls necessary to secure their environment and user identities.

https://www.microsoft.com/en-us/trustcenter